
Hey everyone,
I hope everyone reading this does so safely at home, practicing social distancing and keeping themselves and their family healthy during this crazy COVID-19 outbreak.
Once again, a delayed post – Becoming, and experiencing life as a father, along with the lots and lots of work going on towards a new and exciting project (hopefully I’ll be able to share more details on that soon) means blogging inevitably falls by the wayside – I’ll try to improve on that!
In a few weeks, Ninja Tag Team: Slash n’ Dash will be 1 year old. To honor the occasion, I’ve decided to do a series of articles on the game’s development process, a sort of a long overdue ‘making-of’, which will culminate with a postmortem I intend to upload on the day of the game’s 1-year anniversary. Hopefully these will be useful to fellow game developers, as I’m going to cover all kinds of things in retrospect, including some WIP pieces and tutorials. Don’t be shy to leave your thoughts in the comments section below.
With that said, let’s tackle our first subject, and the single thing that took the most time during NTT's development: Character sprites!
Background
Investing in a unique graphical style for your video game is one of the smartest things you can do, as the art style is a significant contributor to the overall experience and is the thing players will most likely remember about your game even long after they've moved on to other game worlds. Now I'm not saying the game's core gameplay and mechanics are not at the center of the overall experience (after all, great graphics cannot save an otherwise horrible game), however supporting those elements with attractive graphics increases the game's potential to maintain player interest and excitement for a longer period of time, let alone gives you a significant asset to market your game based on looks alone.
I've long regarded NTT's character sprites as a distinguishing feature of the game’s art style. The style was adopted while working on my 2016 entry for the Greek Secretariat for Information and Communication’s Game Art Contest (click to see). Back then, I took a great deal of inspiration from the Nendoroid series of plastic posable figures. Prior to having a clear picture of how everything would eventually turn out, I knew I wanted to make my next game's characters emulate that adorable, chibi look. When I set out to update the visuals of my first game Chip Rush, I eventually decided to ditch my initial plan of going for 16-bit SNES style graphics, and instead try out an illustrated look to go along with fluid, detailed animations. That being said, I am not much of a 2D artist to achieve a hand-drawn look. In fact, I have more confidence in my 3D skills, and I already had developed a rigged base mesh for a chibi-style 3D character for my GAC entry, so I decided to pursue the Donkey Kong Country way of rendering my 2D sprites using 3D tools. I’ll straight up put it out there: this is probably not the most efficient way to work in 2D, given all the wonderful animation tools out there - keep in mind, a game originally intended as an update to be re-released within a time frame of only a couple of months ended up taking two years - with the graphics taking out the majority of that time.
But enough with the rambling. I promise these next sections will remain focused on the basics of the process. I’ll be using the Enemy sprite for this tutorial (actually, the disguise power-up, in this case), as he’s wearing a mask, so it seems fitting.
Setting up your scene
For this tutorial, I’ll be using Blender (2.79), the open source 3D modelling tool. Now, I'm not claiming to be some Blender guru, but I do know my way around modeling, rendering and animating a stylized 3D character. I believe it is a good idea for any developer working solo to invest some hours in learning the software, as there's a huge repository of content and tutorials to help you achieve different styles and effects. It is through this community that I happened to stumble upon this amazing tutorial on Soft AO Cel Shading. What's great about this tutorial is that it pretty much gives you a way to emulate a hand-drawn style on your 3D renders, complete with nice occlusion effects – not to mention, you can download the actual files and experiment with the author’s setup until you are satisfied with the results.
A thing to note here: I decided not to model the face and facial expressions onto my model. The character’s eyes and mouth were instead layered on as a texture image sequence, where a different image texture was applied for each frame. Hence, I was able to pull off the various facial expressions using a series of anime-style hand-drawn eyes and mouths. There are several tutorials on the web to help you draw different expressions, so I won’t go into much detail on this. This technique helped me save much time, as doing the 3D face rig would be a daunting task on its own.
After you have modeled and animated your character, or asset, make sure to set up your background plane for the occlusion effects, and position your camera in the way that best suits your needs. Mine looks like this:
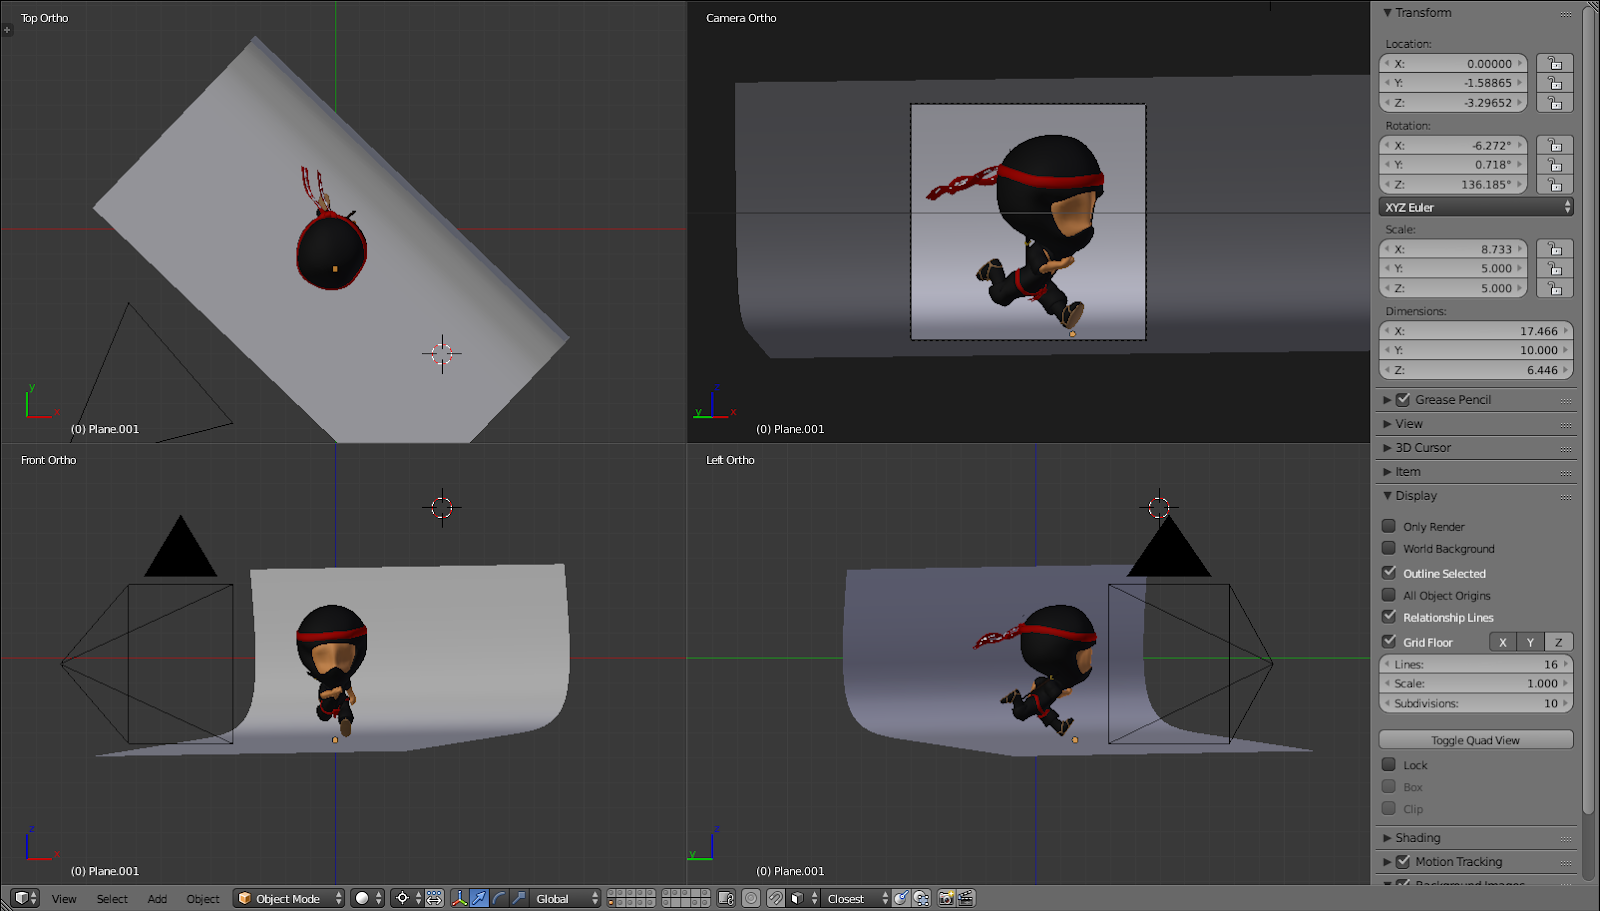
Fig. 1: Blender scene setup prior to rendering.
I decided to render all my sprites at a resolution of 2048x2048, so as to preserve as much of the detail as possible (as the Line squiggle node used in AO Cel shading tends to create thick lines and may cover up some thin objects and details you have worked on and want to show off – in my case, the sword, belt and sandals). For the actual rendering, I kept much of the settings presented in sharkigator’s tutorial intact. After rendering the 19 frames of the run animation (be patient, as it's gonna take some time depending on the sprite size and number of passes, which have to be repeated for each frame of animation – I had boss animations that lasted well over 60 frames, so you can imagine the time it took to render), the end result looks like this:
Make sure to save all your frames in a folder (e.g. ‘Enemy_run_cel’) so they won’t be overwritten by the renders you'll be doing later!

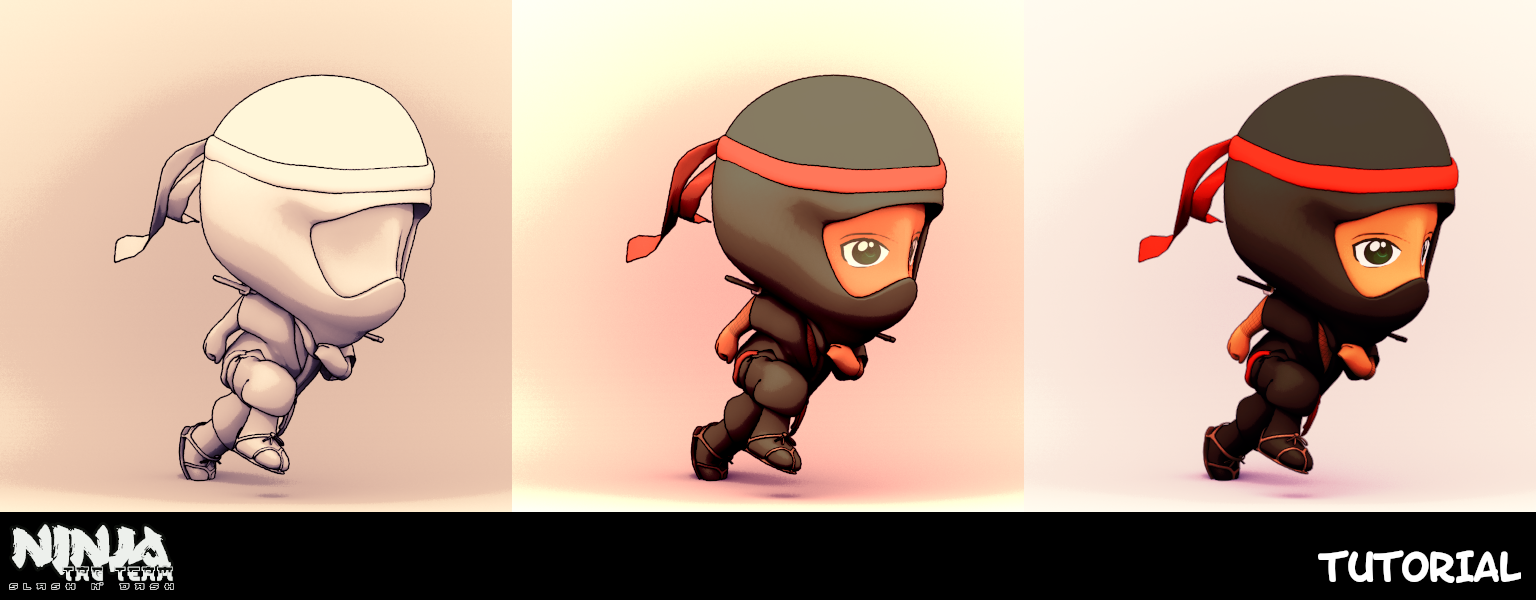
By this point you’re pretty much emulating sharkigator’s tutorial, and ending up with some awesome-looking animation renders that look like hand-drawn sketches. However, it is highly likely that you’ll want some color on these sprites. At this point, sharkigator suggests doing a paint over, but once again, I am not much of an artist to achieve a good result by hand. As such, everything that follows in the next paragraphs is my own contribution.
Rendering
For the actual colors, I used standard Blender Render engine materials, which allow me to color the various assets with basic, colored materials. The main idea is to get the color and some soft shadows, as much of the effect we are going for will be achieved using Gimp and the '_cel' sprites. As mentioned earlier, you can use textures to add more detail to your characters (I used them for my character faces, as well as some pieces of apparel, like the Onna-bugeisha kimono) Feel free to experiment with your settings. I personally find using a low specular (Intensity: 0.01, Hardness: 10) material to achieve a matte look works best for the look I was going for.
To get the color render, you’ll want to go into your Node Editor window and switch off the ‘Use Nodes’ checkbox in ‘Compositing Nodes’. Next, you'll need to remove the AO Material from the 'Layer' tab in your 'Properties' view. You won't need to setup any lighting (unless you want to create specific effects, that is), as I've found that checking ‘Environment Lighting’ in ‘World Settings’ in the 'Properties' view works just fine. Proceed to render the entire animation again, which will give you this result:
Save these frames in a different folder (e.g. ‘Enemy_run_color’) for future use.

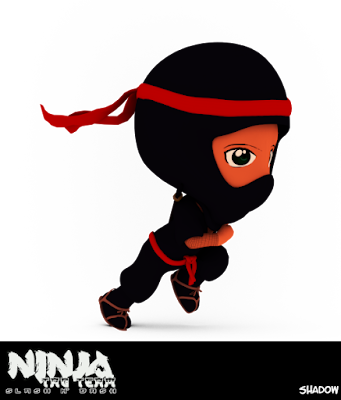
After you’re finished rendering you’ll want to duplicate the AO Material in the 'Materials' tab in 'Properties', then check ‘Transparency’, make sure 'Z Transparency' is enabled and turn ‘Alpha’ to zero. Next, expand ‘Shadow’ and check ‘Shadows only’ – this will enable you to render the sprite shadows on a transparent ground material (You'll need this, as we are going to add the shadows as an optional Layer later on). So your next set of frames to be saved in a different folder (‘Enemy_run_shadow’) will look like this:
Finally, it is useful to get a binary sprite mask. There are many ways to do a black-and-white render of your scene in Blender. I personally make sure to place the background plane on a different layer so I get a black-and-alpha mask so as not to have to do any extra work later. However you decide to go about this, you'll want your next set of animation sprites (again, to be saved in a new folder, e.g. ‘Enemy_run_mask’) to look like this:

"Painting" your cel-shaded sprite
Now that you have all necessary sprite renders, it is time to do the inpainting of your original cel-shaded sprite. As previously mentioned, I used Gimp for this next part, though similar programs such as Photoshop will work just as well. Now bear in mind, this is once again a time-consuming process, especially if you are working with long sequences of animation, so streamlining your processes as much as possible by learning hotkeys and shortcuts to commands will save you lots of time. The following steps will describe working with a single sprite, but in reality, you’ll be wanting to load up the entire animation and work your way through each and every frame in succession.
Open Gimp and load your ‘_cel’ file. Drag and drop the corresponding ‘_color’ sprite on top of that, and change the Blend mode to ‘Grain merge’. After doing this for every frame of animation, you should have something that looks like this:
I strongly advise saving these files again in a different folder (‘Enemy_run_gm’), especially if you’re working with many frames of animation, as these will be used as a basecoat for the next series of steps.

Now we have some color on our sprite! It doesn’t look bad either – but with some additional steps you can get even better results, and colors that really pop. Load up your '_gm' sprite in a different Gimp project. Drag the ‘_color’ sprite on top of it, and switch its blend mode to ‘Soft light’. Now drag the original '_cel' layer on top of the current layer stack, and switch the blending mode to ‘Darken only’. Finally, duplicate your '_color' layer and drag the new layer on top of the stack. Switch blending mode to ‘Screen’. This will give you the final NTT-look result, but feel free to experiment further if you need to. As a reference, the Figure below illustrates the various stages so you can see how each operation affects the end result:
Once again, you’ll want to save these frames in a different folder, ‘Enemy_run_final’. After processing each frame, your sprite will look like this:


Masking and shadows
Once you are happy with your final sprite, it's time to extract it from the background and add transparent shadows, so it can cast a shadow on the ground (if your character is grounded, that is). Open a fresh Gimp project and import your '_mask' frame. Drag n’ drop the corresponding '_final' frame on top of that, followed by the '_shadow' frame. Make sure the '_mask' frame is selected and use the ‘Select By Color Tool’. Click anywhere in the transparent area. Next click on the '_final' frame and press ‘delete’ on your keyboard to get rid of the background plane. Next you’ll want to do a ‘Select->Inverse’ to make sure your sprite mask area is selected. Go to the '_shadow' layer and hit ‘delete’ once again. This will leave you with the shadow part of the sprite only (you don’t need the colored character that comes with it anymore). Next, make sure the '_mask' layer is selected. Go to ‘Select->Grow’, type in 12 and hit ‘Enter’. Select the paintbrush and paint over the '_mask' layer with a black color. This will create the sprite outline.
Toggling visibility of the '_shadow' Layer will allow you to have both a shadowed, and non-shadowed sprite that you can save in different folders! NTT uses shadowed sprites for every character touching the ground, while airborne characters revert to a non-shadowed counterpart. You can see the final results in the image below:

After creating your spritesheets, and depending on your requirements, you might want to make the shadows on your shadowed sprite more visible. To do so, I copied and anchored the layer 8 times. Next break down the sprite sheet into its RGBA components (‘Colors->Components->Decompose’ and use ‘RGBA’ Color model). Click on the Alpha channel and enter ‘Color->Curves’. By dragging down the curve you can tweak the amount of shadow you want your character to cast. Re-compose the image through ‘Colors->Components->Compose’, again using ‘RGBA’ Color model and save the new spritesheet.
And that’s it! I hope this tutorial sheds some light on some of the techniques used to achieve the overall look of Ninja Tag Team: Slash n' Dash. It is definitely a lot of work and a time-consuming process, but I believe the end result is definitely worth the time I put into every single character. If you guys have any questions, I encourage you to leave them in the comments! You can also follow Ninja Tag Team and/or Gortyn Code on Facebook and leave your comments there!
As I said, I plan to release more (hopefully interesting) articles on this blog. Future posts will probably not be as long, or as broad as this one; instead I’ll be going into greater depth on some really interesting things about the game world. Hopefully you'll be able to find something you can use in your own projects!
If you’re interested to see how every character sprite turned out, why not download Ninja Tag Team for free, and take a look?
Until next time!
K.C.
Δεν υπάρχουν σχόλια:
Δημοσίευση σχολίου